A missed grease fitting or ignored hydraulic leak doesn’t just cost you a repair bill—it costs you a full day of revenue during your busiest weeks. Live floor trailer maintenance is the single most controllable factor in avoiding unplanned downtime, and most breakdowns trace back to something a five-minute inspection would have caught.
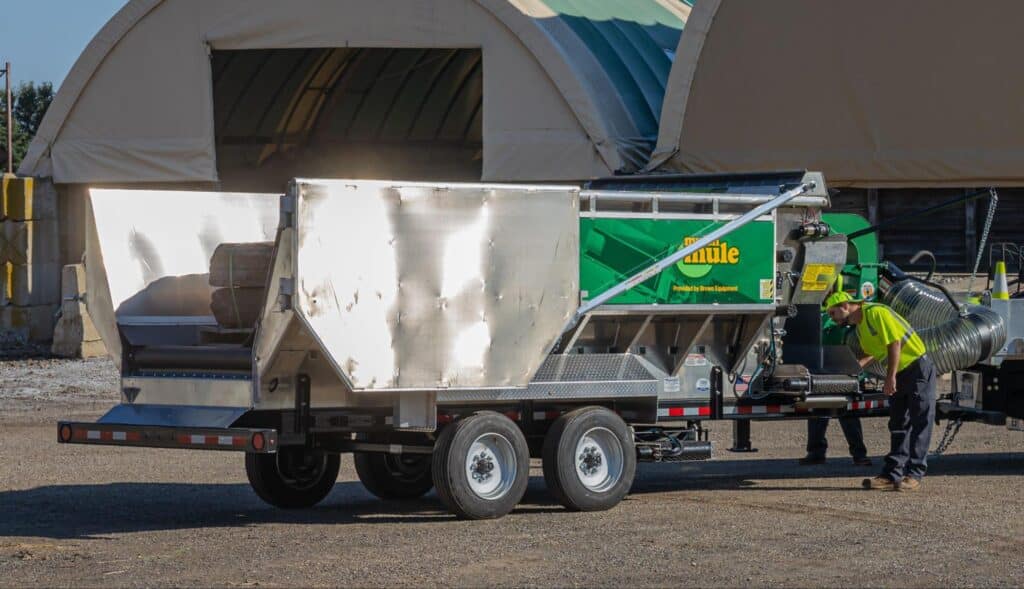
Unlike standard dump trailers, live floor systems add mechanical complexity: rolling chains or belts, hydraulic drive components, conveyor assemblies, and conditioning tine bars. Materials like mulch, soil, and compost introduce moisture, organic acids, and abrasive particles that accelerate wear if left unchecked. The Mulch Mule trailer is engineered for minimal maintenance with its durable aluminum hopper and robust hydraulic system—but even the best-built equipment needs a consistent routine to deliver its full 20+ year lifespan.
Key Takeaways
- Live floor trailers need system-specific maintenance beyond standard trailer care. The floor drive, conveyor, and hydraulics each have unique failure modes that generic checklists miss.
- A five-minute pre-use walkaround catches most problems early. Checking for leaks, loose hardware, and tire inflation before every load prevents the majority of in-field breakdowns.
- Daily cleanout is the single most impactful maintenance habit. Organic materials decompose, corrode metal, and cause floor binding overnight if left in the hopper.
- Monthly lubrication and tension checks on floor chains, conveyor belts, and all grease fittings keep the system running smoothly through peak season.
- Seasonal pre-peak service—including hydraulic fluid changes and brake inspection—should be completed before high-volume work begins.
- Know when to stop and call for service. Metal shavings in hydraulic fluid, cracked sprocket teeth, or persistent floor binding require professional diagnosis.
Why Live Floor Trailer Maintenance Is Different
Standard trailer maintenance covers tires, brakes, lights, and frame integrity. Live floor trailers add three interdependent systems that need their own routines:
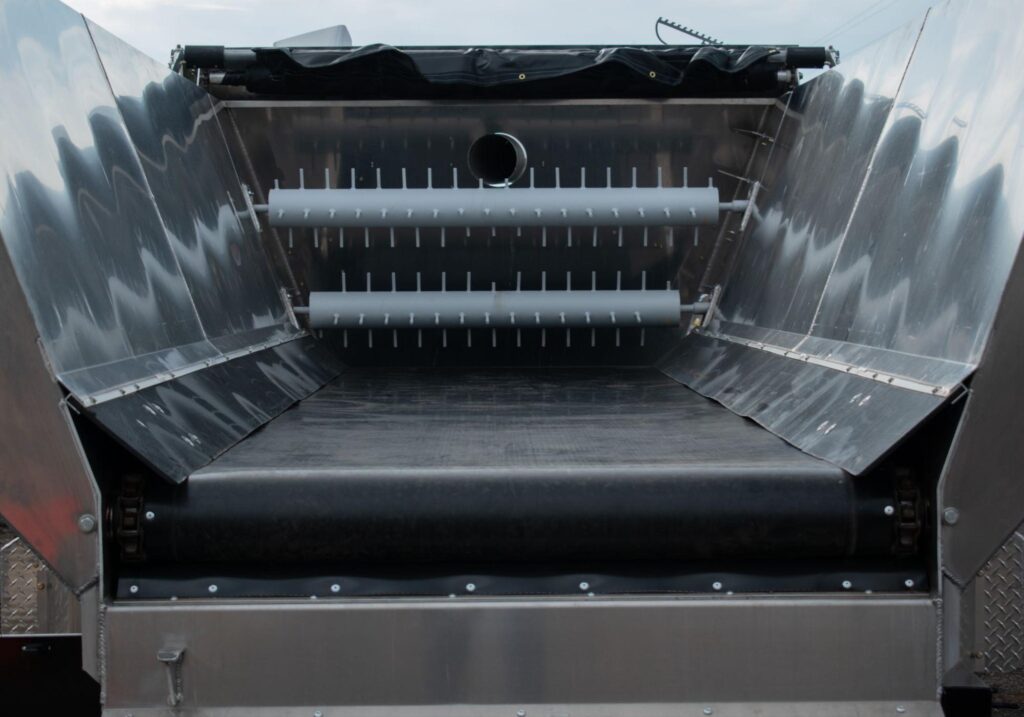
- Floor drive (belt, chain, sprockets, bearings): Live floor systems vary by manufacturer. The Mulch Mule uses a direct-drive variable-speed belt-over-chain system rather than traditional slats. Chain stretch and sprocket wear are still the most common mechanical issues, and belt condition matters too—worn or cracked belts reduce traction and discharge consistency. A loose chain skips teeth; a worn sprocket accelerates chain wear. Left unchecked, one failing component cascades into a much larger repair.
- Discharge conveyor: Belt tracking, tension, and roller condition directly affect discharge speed and consistency. A slipping or misaligned belt slows your crew and creates uneven material flow.
- Hydraulic system: Contaminated fluid, low levels, worn hoses, and failed seals lead to sluggish operation, overheating, or complete system failure. The Mulch Mule’s high-efficiency hydraulic drive is designed for reliability, but fluid quality still requires regular monitoring.
Landscaping compounds these risks. Organic materials generate acids as they decompose. Sand and soil are abrasive. Gravel chips coatings. Leaf debris wraps around rollers. Pressure washing drives water past seals if you’re not careful. Understanding these material-specific risks is what separates a maintenance routine that works from one that just checks boxes.
According to the Bureau of Labor Statistics, building and grounds maintenance workers experienced a fatality rate of 7.1 per 100,000 FTE workers in 2023, with contact incidents accounting for roughly a quarter of those fatalities. OSHA’s guidelines for landscaping equipment emphasize that routine maintenance and pre-use inspections are foundational to worker safety—not just equipment reliability.
Safety: Shutdown and Lockout Before Any Maintenance
Before any inspection or service, shut down completely: engine off and key removed, wheels chocked on both sides, all guards secured, and the wireless remote powered off and set away from the work area. On the Mulch Mule, the 13HP Honda iGX390 must be fully shut down—not just idled.
Live floor trailers have specific hazards to respect. Floor chains and sprockets create pinch and crush zones. Reversible floor systems can move material in either direction, so confirm the system is powered down—not just paused—before accessing the hopper. Even with the engine off, residual hydraulic pressure can remain in hoses; relieve pressure before disconnecting any lines. Minimum PPE for maintenance includes safety glasses, mechanical-rated work gloves, and steel-toed boots.
Live Floor Trailer Maintenance Checklist by Interval
This checklist covers the full scope of live floor trailer maintenance, organized by frequency. Adjust intervals based on your operating hours, material types, and OEM recommendations—but when in doubt, service sooner rather than later.
Pre-Use / Every Load
A quick walkaround before every load takes less than five minutes:
- Leak check: Walk the perimeter and look underneath for hydraulic fluid, oil, or coolant. Fresh fluid on a hose fitting means something changed since the last use.
- Hardware and guards: Confirm visible bolts, pins, and fasteners are tight. Verify guards over chains, sprockets, and the conveyor are secure.
- Tires, lights, brakes: Check tire pressure and condition. Connect to the tow vehicle and test all lights. Verify brakes and inspect the breakaway pin and cable.
- Quick function test: Run the floor forward and reverse briefly (no load). Listen for grinding, chattering, or squealing. Watch for uneven movement.
Daily (End of Each Operating Day)
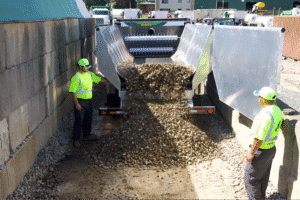
- Full cleanout: Remove all material from the hopper, conveyor chute, and rear discharge. Organic materials like mulch and compost generate heat and acids overnight, accelerating corrosion and causing the floor system to bind by morning.
- Conveyor belt visual: Check that the belt is centered on rollers with no excessive sag.
- Critical greasing: Grease the fittings specified for daily service in your OEM manual—typically floor chain drive bearings and conveyor roller bearings at minimum.
- Engine: Check oil level on the Honda iGX390. Top off if needed. Verify the air filter housing is secure and debris-free.
Weekly (Every 5–10 Operating Hours)
- Deep clean: Wash the hopper interior, conveyor chute, and discharge surfaces. Clear packed material from around sprockets, rollers, and bearings.
- Component inspection: On belt-over-chain systems like the Mulch Mule, check the belt surface for wear. Inspect sprocket teeth for rounding or chipping. Examine rollers for flat spots or seized bearings. On slat-based trailers, check slats for cracks or bending. Check chain tension level for obvious sag or tightness.
- Hydraulic lines: Trace every visible hose. Look for abrasion, bulging, cracking, or leaks at fittings. Confirm hoses are routed away from hot surfaces and sharp edges.
- Electrical and controls: Inspect wiring for chafing or rodent damage. Test the wireless remote and engine remote start system.
- Greasing: Grease all primary fittings, including floor chain bearings, conveyor rollers, and pivot points. This supplements daily critical-point greasing and may replace the need for a full monthly lube round during heavy-use weeks.
Monthly (Every 20–50 Operating Hours)
- Full lube round: Hit every grease fitting—floor chain bearings, conveyor bearings, pivot points, tailgate hinges, hydraulic jack. Wipe excess to prevent dirt buildup.
- Floor chain tension: Measure chain sag per OEM spec and adjust. Over-tight chains accelerate sprocket wear; under-tight chains skip teeth. If stretch exceeds the adjustment range, replacement is due.
- Conveyor belt tension and tracking: Adjust per manufacturer procedure. Run at operating speed after adjustment and observe for drift.
- Brakes and wheel bearings: Check brake shoe/pad wear thickness. Inspect drums for scoring. Check wheel bearings for heat buildup or rumbling.
Seasonal / Pre-Peak
Complete this service before your busiest season—typically late winter or early spring:
- Hydraulic fluid and filter change: Drain and replace with OEM-specified fluid. Replace the filter. Contaminated fluid is the leading cause of hydraulic system failure.
- Brake system: Measure wear against minimum specs. Replace worn components. Verify the breakaway battery is charged and functional.
- Wheels and tires: Torque all lug nuts to spec. Replace tires showing weather cracking or tread below 4/32”. Replace any tire older than five years regardless of appearance.
- Tarp system: Test the automatic tarp for full open/close operation. Inspect for tears or UV damage. Clean tracks and lubricate.
- Full load/unload test: Load the trailer and run a complete discharge cycle—forward and reverse—at various speeds to confirm all systems work under load before peak season.
Cleaning Best Practices
Cleaning is maintenance. Material left in the hopper decomposes, corrodes, packs, and jams. Focus your effort on the spots where material accumulates most: around floor chain sprockets and tensioners, under and around the belt and chain assembly, inside the conveyor chute, around the conditioning tine bars, and behind tailgate seals.
When pressure washing, avoid blasting directly into bearings, seals, or electrical connections—high-pressure water forces past seals and washes out grease. Keep water away from the hydraulic pump and engine air intake. Use moderate pressure (under 2,000 PSI) and spray parallel to sealed components, not directly into them. Clean top to bottom so debris flows out of the trailer.
After every washdown, let the trailer air-dry with the tailgate open. Once dry, re-grease any bearings exposed to water. Apply corrosion inhibitor to exposed steel surfaces. The Mulch Mule’s aluminum hopper resists corrosion naturally, but steel frame components and chain assemblies benefit from this step.
Troubleshooting: Common Symptoms and What to Check
When something goes wrong in the field, start with these common diagnoses:
Floor is uneven, binding, or chattering:
- Material packed around sprockets or under the belt and chain—clean thoroughly and retest
- Chain tension imbalance between sides—measure and equalize per OEM specs
- Worn sprocket teeth or seized bearings—inspect and replace as needed
Floor won’t move at all:
- Check hydraulic fluid level first, then inspect the pump, valve, and motor for leaks
- Look for a mechanical jam—foreign object or broken chain link
- Verify remote battery, receiver connection, and engine RPM
Conveyor slips or tracks off center:
- Adjust belt tension per OEM procedure
- Realign rollers and verify frame straightness
- Clean or replace a worn/glazed belt
Hydraulic issues (slow, hot, or noisy):
- Slow operation—check fluid level and filter first
- Overheating—look for kinked hoses, low fluid, or restricted return lines
- Whining noise—air in the system or cavitating pump; bleed per OEM instructions
Red Flags: Stop and Call for Service
If you encounter any of the following, stop operating the trailer and contact your dealer or the Mulch Mule servie team: metal shavings in hydraulic fluid, cracked sprocket teeth, floor binding that persists after cleaning and adjustment, hydraulic hoses bulging at fittings, structural cracking in the frame or axle mounts, or brake system failure. Attempting to work through these conditions risks catastrophic failure.
Storage and Winterization
Between jobs, always clean out the hopper before parking—even one night of wet mulch on steel starts surface corrosion. Park on level ground, chock the wheels, and close the automatic tarp if storing outdoors.
For long-term off-season storage:
- Fuel: Run the Honda iGX390 dry or add stabilizer to a full tank. Stale fuel is the top cause of hard spring starts.
- Battery: Disconnect and store in a climate-controlled space with a trickle charger. Replace if over three years old.
- Rodent prevention: Seal openings to the hopper, engine compartment, and electrical enclosures. Wiring damage from rodents is expensive and often not discovered until spring.
- Corrosion protection: Clean thoroughly. Apply corrosion inhibitor to exposed steel. Complete a final full lubrication round—fresh grease displaces moisture and seals bearing surfaces over winter.
- Tires: Inflate to maximum sidewall pressure. Jack-stand the trailer if possible to prevent flat spots.
OEM Parts, Warranty, and Documentation
Critical components—floor chains, sprockets, hydraulic seals, conveyor belts, control electronics—should always be sourced from the original manufacturer to ensure proper fit and warranty compliance. The Mulch Mule service team is accessible directly. When you call, have your trailer VIN, approximate operating hours, a description of the symptom, and photos or a short phone video ready. This helps the team diagnose the issue and ship the correct parts the first time.
Document all maintenance in a simple log: date, operating hours, task, parts used, technician initials. This protects your warranty, helps diagnose recurring issues, and builds knowledge that survives crew turnover. As Keegan Minard of Minard’s Landscape and Design puts it: “We’re seeing double the productivity with the same amount of guys.” That performance comes from equipment that’s maintained well and ready to work every morning. Watch his full testimonial.
Frequently Asked Questions About Live Floor Trailer Maintenance
How often should I grease a live floor trailer?
For landscaping operations running daily during peak season, grease floor chain bearings and conveyor roller bearings daily, and complete a full lubrication round every 20–50 operating hours. Always follow the specific intervals in your OEM manual. The Mulch Mule is designed for easy component access and no specialty tools, so greasing takes minutes.
What causes most live floor trailer breakdowns?
The three most common causes are neglected lubrication (leading to bearing and chain failure), material buildup around sprockets and the belt or floor assembly (causing binding), and contaminated or low hydraulic fluid (resulting in pump damage). All three are preventable with the routine maintenance in this guide.
Is a Mulch Mule worth the investment for a small landscaping company?
The Mulch Mule can reduce labor costs by up to 30% and fills a wheelbarrow in 3–6 seconds—performance that translates to more jobs per day with fewer crew members. Its 20+ year lifespan and strong resale value (used units 10+ years old commonly sell for $40,000+) mean the per-year ownership cost is significantly lower than equipment needing frequent replacement.
Can I do all maintenance myself, or do I need a dealer?
Most routine maintenance—walkarounds, cleaning, greasing, chain and belt adjustments, fluid checks—can be handled by any mechanically competent crew member. Hydraulic fluid changes and brake overhauls are doable for shop-equipped operations. Issues like persistent floor binding, hydraulic pump problems, or structural repairs should go to a qualified technician or the Mulch Mule service team.
How should I maintain my Mulch Mule during leaf season?
When using the optional 37HP Billy Goat leaf vacuum attachment, follow the standard daily and weekly checklist, plus pay extra attention to clearing debris from the vacuum inlet, impeller housing, and hose connections. Leaf debris wraps around components faster than other materials. Check the vacuum air filter daily during heavy use.
Keep Your Trailer Running—and Your Crew Earning
A live floor trailer is a serious investment. Protecting it takes consistency, not complexity. Ready to see how the Mulch Mule’s low-maintenance design fits your operation? Connect with an ambassador to see the Mulch Mule in action during a live demo.