For landscape contractors, mulch suppliers, and property maintenance teams, making a major investment in mulch handling equipment is a big decision. Brochures, spec sheets, and polished videos can only tell you so much—and almost always show best-case scenarios, not the wet mulch, tight spaces, and long days your crews actually face. Choosing wrong can mean wasted capital, higher labor costs, safety issues, and equipment that never quite fits your operation.
This live demo checklist is designed to change that. It walks you step-by-step through exactly what to look for during a mulch equipment demonstration—so you can test performance in real-world conditions, involve your crew in the evaluation, and confidently avoid costly mistakes before you buy.
Why a Live Demo Matters
Investing in the right equipment goes beyond brochures and specifications. A live demo lets you see how the machine performs in conditions similar to your job sites. You can assess factors such as ease of operation, crew ergonomics, and reliability under varying materials and terrain. This hands-on experience clarifies whether the equipment truly supports your goals for productivity and safety.
Brochures often showcase ideal conditions. They may highlight maximum capacities and optimal performance that don’t always translate to real-world scenarios. For instance, while a brochure might detail a “quick-discharge” rate, a live demo will reveal how the system handles wet, heavy materials or navigates uneven ground. Observing the equipment in action helps you avoid surprises after purchase.
A live demo also provides an opportunity for your team to interact with the equipment. Immediate feedback from operators regarding controls, ease of maintenance, and safety features can be crucial in making an informed decision that benefits your entire operation.
Before the Demo: Prepare and Plan
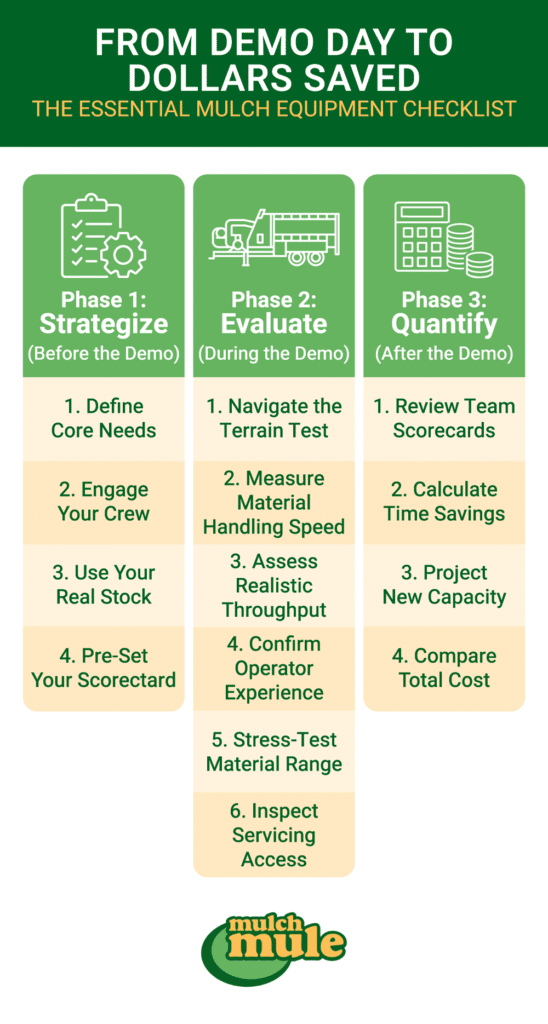
The value of a live demo starts long before the equipment shows up on your job site. A bit of upfront planning helps you test the machine in realistic conditions, involve the right people, and capture apples-to-apples data. Use this checklist before the demo to clarify what you need, set clear expectations, and make sure the time you spend on-site leads to a confident, objective decision.
- Clarify Your Business Needs: Define the tasks the equipment must handle, such as transporting bulk mulch or removing debris.
- Assemble Your Team: Involve operators and supervisors to review usability and comfort.
- Bring Real Materials: Test using actual materials from your work sites to ensure performance under realistic conditions.
- Create a Scorecard: Develop a simple evaluation sheet that covers key criteria such as speed, maneuverability, capacity, and safety.
- Set Clear Benchmarks: Establish measurable goals for tasks (for example, target times for loading or unloading) to objectively assess the equipment.
During the Demo: On-Site Live Demo Checklist
A structured checklist helps you extract the most meaningful insights during a live demo. Use the following streamlined guide to keep your evaluation focused:
Maneuverability and Jobsite Fit
Focus on the equipment’s performance within environments similar to your job sites:
- Maneuverability: Check how easily the equipment navigates tight spaces, slopes, and uneven surfaces.
- Space and Setup: Verify that the equipment fits well within your job site layout, ensuring there is ample room for loading and unloading.
- Workflow Integration: Confirm that the equipment integrates smoothly with your current processes and existing vehicles or trailers.
Assessing Loading and Unloading Efficiency
Efficiency in material handling is critical. During the demo, pay close attention to:
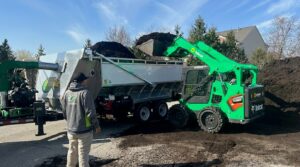
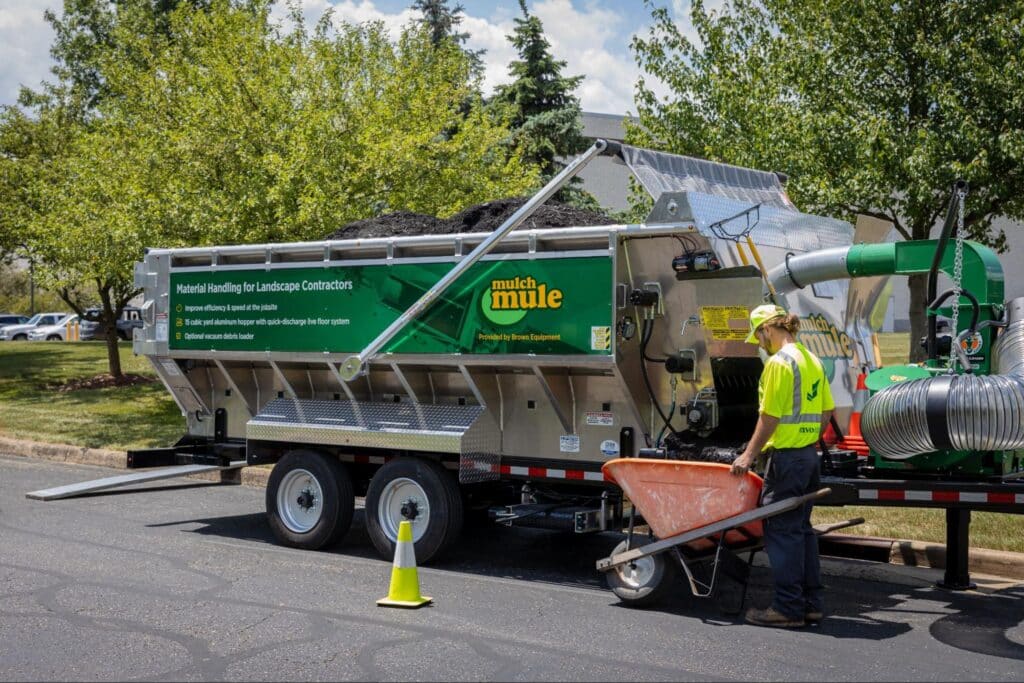
- Operational Speed: Record how quickly the equipment loads and discharges materials. For example, observe if a live floor system maintains a consistent flow when handling a full 15-cubic yard load.
- Labor Requirements: Evaluate the number of crew members needed to operate the equipment effectively. Notice if the process minimizes physical strain or repetitive tasks.
- Feature Functionality: Test special features that can drastically reduce handling time and effort, such as a curbside discharge or wheelbarrow-filling capability. If you handle large amounts of leaves, a solution like the Mulch Mule leaf vac may streamline debris collection.
Evaluating Productivity and Performance
Time efficiency and productivity gains are key indicators of a sound investment:
- Timed Workflows: Measure how long it takes to complete common tasks, such as fully loading or discharging a hopper.
- Real-World Throughput: Compare the advertised capacity to the actual performance under challenging conditions.
- Overall Impact: Consider whether the equipment reduces manpower and speeds up project completion, translating into cost savings and increased project capacity.
Ergonomics and Safety Check
Equipment must be safe and user-friendly. Involve your crew to evaluate:
- Ease of Operation: Determine if controls are intuitive and if the system is easy to learn and use.
- Safety Features: Look for features that protect operators from injury—guards, stable mechanisms, and clear emergency stops.
- Operator Comfort: Solicit feedback on how the equipment feels during extended use, paying attention to vibration levels and accessibility of controls.
Versatility Across Materials & Tasks
Your mulch equipment should handle more than one perfect material on one perfect day. During the live demo, push it to perform across the full range of work you actually do.
- Test Multiple Materials: Run the equipment with different materials—mulch, soil, compost, leaves, and even damp or heavy loads—to see where performance changes.
- Check Flow Consistency: Watch how consistently the material feeds and discharges. Look for clogs, bridging, or stop-and-go flow, especially with wet mulch or mixed debris.
- Evaluate Task Flexibility: Ask the vendor to simulate your most common tasks (e.g., beds, tree rings, long runs along curbs) and confirm the setup works for each without constant adjustment.
- Assess Changeover Time: Time how long it takes to switch between materials or job types. Note whether you can transition from mulch to debris or leaves without excessive clean-out or downtime.
Maintenance, Parts, and Uptime
Even the most impressive demo doesn’t matter if the equipment is hard to maintain or frequently down. Use the demo to inspect how serviceable the system is and what support stands behind it.
- Inspect Service Access: Look at how easily you can reach wear points, hydraulic components, belts, chains, and the live floor or blower system for inspection and routine maintenance.
- Ask About Daily/Weekly Tasks: Have the vendor walk you through daily and weekly maintenance steps—greasing, cleaning, tightening—and estimate how much time your crew will spend on them.
- Confirm Parts Availability: Ask where parts ship from, typical lead times, and whether common wear parts (belts, hoses, bearings, etc.) are stocked.
- Review Warranty and Service Options: Clarify what’s covered under warranty, who performs service in your region, and what the response time looks like if a breakdown threatens your schedule and revenue.
Vendor Partner Checklist: Support, Warranty, and Training
A reliable vendor enhances your investment’s value.
- Warranty and Support: Confirm what the warranty covers and for how long. Inquire about the availability of parts and the typical turnaround time for repairs.
- Training and Resources: Determine if the vendor offers support services or training programs to help your team maximize the equipment’s potential.
- Ambassador Programs: Equipment ambassador or demo partner programs can provide additional opportunities to experience machines live in your region, often on real job sites similar to your own.
Pro Tips to Get the Most From Your Demo
Once the demo is scheduled, a few simple moves can turn it from a quick show-and-tell into a real decision-making tool. Use these tactics to squeeze maximum value out of your time on-site:
- Schedule During a Busy Period: Book the demo when your crews are handling typical or peak workloads so you see how the equipment performs under pressure—not on a slow day.
- Bring Your Key People: Have at least one operator, one supervisor, and a decision-maker present so you can evaluate usability, workflow fit, and ROI all at once.
- Prep a Question List: Come with written questions about durability, common failure points, maintenance intervals, parts availability, and scalability as your business grows.
- Run a Mini Training Session: Ask the vendor to walk your operators through startup, operation, and shutdown as if they’re being trained. Time how long it takes for them to feel comfortable.
- Record the Demo: Capture video of loading, unloading, tight maneuvers, and any troubleshooting. This makes it easier to compare multiple equipment options later with your team.
- Document Metrics on the Spot: Use your scorecard to record load times, discharge times, crew size, and any issues while they’re fresh—don’t rely on memory.
After the Demo: Compare Options and Calculate ROI
Once the demo is over, turn what you saw into a clear decision. Start with a quick debrief:
- Gather your team: Include everyone who attended the demo.
- Review your scorecards: Compare ratings for maneuverability, speed, crew effort, safety, and fit with your current fleet.
- Capture honest feedback: Note standout strengths, frustrations, and any red flags.
Then, translate performance into numbers:
- Estimate time savings: Use your timed runs. For example, if a live-floor mulch trailer unloaded a 15-yard load in 8 minutes vs. your current 20 minutes, that’s 12 minutes saved per load.
- Quantify labor impact: If the new setup lets you run with 3 crew members instead of 4—or finish more jobs per day—estimate those labor savings over a season.
- Compare throughput: Use your demo benchmarks to estimate realistic yards per hour for each option.
Finally, stack these gains against total cost of ownership: purchase price, maintenance, parts, and expected lifespan. With demo metrics, crew input, and cost data in one place, you can make a documented, ROI-focused decision instead of going on gut feel.
Check out this video below to tag along with Trace’s Lawn care who utilizes (2) Mulch Mules to grow their business and become more efficient.
Bonus: Use Your Demo Benchmarks After You Buy
Your demo numbers can keep working for you after the purchase:
- Validate performance: In the first few weeks, track actual load/unload times and yards per day and compare them to your demo benchmarks.
- Monitor labor and output: Watch crew size, hours, and jobs completed per day to confirm the equipment is delivering the productivity you expected.
- Refine your processes: If certain loading methods or crew setups worked best during the demo, standardize them as your go-to approach.
- Recheck periodically: Once or twice a season, revisit those benchmarks to spot efficiency drops, training needs, or maintenance issues early.
Treating your demo benchmarks as a baseline—not just pre-purchase data—helps you keep your mulch equipment performing at its best over the long term.
FAQ: Live Demos for Mulch Equipment
What materials should I bring to a live demo?
Bring the same materials your crews handle every day: hardwood or dyed mulch, wet or heavy mulch, leaves or debris, and soil or compost if relevant. Testing with real material from your jobs is the best way to see how the equipment will actually perform.
Who from my team should attend the demo?
Ideally, you’ll have at least one primary operator, one supervisor or foreman, and a decision-maker present. This mix lets you evaluate usability, workflow fit, and ROI at the same time, instead of relying on secondhand impressions.
What should I measure during the demo?
Track basic performance metrics like load time, unload time, and how many crew members are needed to operate the setup. Also note how easily the equipment maneuvers, how comfortable and safe it feels for operators, and whether you experience any clogs or downtime.
How do I compare a mulch trailer or live floor system to my current setup?
Use your demo numbers to compare minutes per load, loads per day, and crew size against how you work now. From there, you can estimate labor hours saved per week or season, and how many more yards or jobs you could realistically complete with the new equipment.
What questions should I ask the vendor during the demo?
Ask about maintenance requirements, daily/weekly service tasks, and what common wear parts are needed and how quickly they ship. Clarify warranty coverage, who handles service in your area, and request real-world examples or case studies from operations similar to yours.
Making a Confident, ROI-Driven Equipment Investment
A live demo is your best chance to see how mulch equipment will really perform on the jobs that matter most to your business. By preparing in advance, following a structured on-site checklist, and turning your demo data into clear ROI comparisons, you move beyond gut feel and glossy brochures to a decision grounded in safety, productivity, and long-term profitability.
Whether you’re running mulch installs, seasonal cleanups, or year-round bulk material hauling, the right equipment can reduce crew size, shorten job times, and open the door to more profitable work. Use this checklist as your framework to evaluate every demo the same way—so you can confidently choose the solution that fits your operation today and scales with you tomorrow.
If you’re ready to see what this looks like in real life, take the next step. Schedule a live demo with Mulch Mule to put our equipment to the test on your materials, your workflows, and your job conditions. Experience the difference for yourself and see how a Mulch Mule trailer can help you move more yards, with fewer people, in less time.